This example shows you how to use the Interface Builder to design a simple interface. It explains how to create the layout and the menu system, and demonstrates some of the attributes that you can set. Finally, the interface is saved to a file, and combined with some other simple code to produce a working example. You are strongly advised to read the preceding sections of this chapter before (or in conjunction with) this section. It is also useful, though not essential, if you are familiar with the editor (12 The Editor), the listener (20 The Listener), and Common Lisp systems.
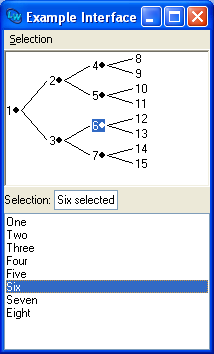
The final interface created is shown in Example interface. It consists of a column layout which contains a graph pane, a display pane, and a list panel.
Any select action performed in either the graph pane or the list panel is described in the display pane. This includes the following actions:
Double-clicking any item in either the graph pane or the list panel displays a dialog which shows which item you double-clicked.
Lastly, there are menu commands available which display, in a dialog, the current selection in either pane. Choose Selection > Graph to see the currently selected items in the graph pane, and choose Selection > List Panel to see the currently selected items in the list panel.
This section shows you how to create the basic layout for your interface, without specifying any attributes. Normally, this stage would take you only a few seconds. The process is described in detail here, to illustrate the way that the Interface Builder ensures that the most appropriate item is selected in the graphs of both the layouts and menus views, so as to minimize the steps you need to take when creating an interface.
 toolbar button.
A new, empty, interface skeleton appears.
To begin, you need to add the main column layout to the interface using the buttons panels at the bottom of the Interface Builder. The Layouts tab at the bottom of the Interface Builder (as distinct from the Layouts tab you use to switch to the layouts view), lists the different types of layout that you can add to an interface.
A column layout object is added as a child of the interface object. Nothing appears in the interface skeleton yet, since a column layout is a container for other window objects, and cannot itself be displayed. Note that the column layout remains selected in the layout graph. This is because column layouts are objects which can themselves have children, and the Interface Builder assumes that you are going to add some children next.
The graph pane object is added as the child of the column layout, and a graph pane appears in the interface skeleton.
The objects that you specify are added to the interface, and the interface skeleton is updated accordingly. Note that the column layout object remains selected throughout. You have now created the basic layout for the interface.
Next, suppose that you decide to add a title to the left of the display pane. You might want to do this to make it clear what information is being shown in the display pane.
To do this, you can create a new row layout, add a title pane to it, and then move the existing display pane into this new row-layout. In addition, you must reorganize some of the elements in the interface.
Column-Layout-1 is still selected in the Layout hierarchy area.
The new row layout needs to be added as a child of the column layout.
Notice that the new row layout remains selected, ready for you to add objects to it.
Next, you must move the display pane you have already created, so that it is contained in the new row layout.
Display-Pane-1 and choose Edit > Cut.Row-Layout-1 and choose Edit > Paste.
The items have already been placed in the row layout in the positions you want them. However, the row layout itself has been added to the bottom of the interface; you want it to be in the same position as the display pane you initially created. To do this, move the list panel to the bottom of the interface.
List-Panel-1 and choose Object > Lower from the menu bar on the Interface Builder itself.
You have now finished creating the layout for the example interface. The next step is to name the elements of the interface in a sensible fashion.
As you have already seen, the Interface Builder assigns default names such as Row-Layout-1 to the elements you add to an interface; you usually want to replace these with your own names. In addition, there are probably titles that you want to add to the interface; you can see the default titles that have been created by looking at the interface skeleton. The next stage of the example shows you how to change these default names and titles.
Changing the name or title of an element is actually just a case of changing the value assigned to an attribute of that element, as described in 19.6.4 Setting the attributes for the selected object. You would normally assign values to a number of different attributes at once, rather than concentrating on the names and titles of elements. The example is structured in this way to give you an idea of the sort of working practices you might find it useful to adopt when generating interface code.
To recap, the layout hierarchy of the example interface is shown in Layout hierarchy of the example interface. To ensure that you can understand this layout easily in the future, it is important to assign meaningful names and titles to the elements it contains now.
Interface-1 object and then use the Interface > Attributes menu item to show the attributes dialog.
The Attributes dialog appears as shown in Attributes dialog for the example interface.
Notice that the Name attribute of the interface has the value INTERFACE-1, and the Title attribute has the value "Interface-1".
Note: If this is not the first interface you have created in the current session, the number is different.
ib-example."Example Interface".
The name of the interface is now displayed as Ib-Example in the Layout hierarchy area, and the title of the interface skeleton changes to Example Interface.
Note: Case is not significant in the Name attribute, because it is a Common Lisp symbol, but it is significant in the Title attribute, which is a string.
Column-Layout-1 element. Double-click to display its Attributes dialog (you will now find this more convenient than using the Object > Attributes menu item). Change the value of its Name attribute to main-layout and click OK.
Now change the names of the other objects in the interface.
graph, and its Interaction attribute to :extended-selection. Click OK.:extended-selection. Do not click OK yet.
The value of the Interaction attribute allows you to select several items from the list panel and the graph pane, using the appropriate method for your platform.
'("One" "Two" "Three" "Four" "Five" "Six" "Seven" "Eight")
The row layout you created contains objects which are used solely to display information.
display-layout.display-layout to :center. Click OK.
This value of the Adjust attribute centers the title pane and the display pane vertically in the row layout, which ensures their texts line up along the same baseline.
In the working example, the display-layout object is going to show information about the current selection, so you need to change the names and titles of the objects it contains accordingly.
selection-title and its Text attribute to "Selection:". Click OK.selection-text, and its Text attribute to "Displays current selection". Click OK.
This specifies a text string that is displayed when the interface is initially created. This string disappears as soon as you perform any action in the interface.
The layout hierarchy is now as shown in Layout hierarchy with names specified. The names that you have assigned to the different objects in the interface make the purpose of each element more obvious.
Next, you need to create a menu system for the example interface. This section shows you how to create the basic objects which comprise it.
A menu bar is created automatically when you create a new interface. To create the menu system for the example interface, you need to add a menu which contains two items.
Menu-Bar object in the Menu hierarchy area.Notice that, as in the layouts view, an object remains selected if it can itself have children. This means that creating the basic menu structure is a very quick process.
Next, you need to name the objects you have created. As with the layouts, this is achieved by specifying attribute values.
Menu-1 menu is still selected, and use the Object > Attributes menu command to display its Attributes dialog.selection-menu. Do not click OK yet.
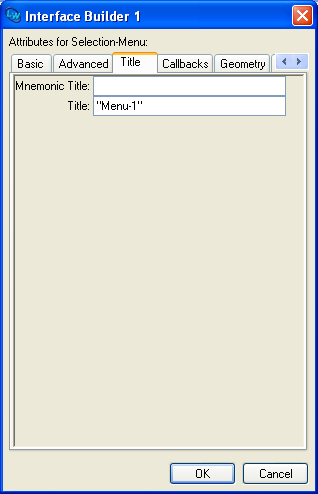
As well as specifying the Name attribute for the menu you created, you need to change the Title attribute of each object you created. To do this, you must ensure that the appropriate attribute categories are displayed in the Attributes dialog.
The Attributes dialog changes to appear as shown in Displaying title attributes for a menu.
"Selection". Click OK.
The Title attribute is used to specify the title of the menu that appears in the interface itself; note the change in the interface skeleton.
Next, you need to change the attributes of the two menu items.
"Item-1" object and press Return."Graph" and the Name attribute to graph-command. Click OK."Item-2" object to display its Attributes dialog and change the Title attribute to "List Panel" and the Name attribute to list-panel-command. Click OK.
You have now finished the basic definition of the menu system for your example interface.
The interface that you have designed contains a complete description of the layouts and menus that are available, but does not yet specify what any of the various elements do. To do this, you need to specify callbacks in the interface definition. As you might expect, this is done by setting attribute values for the appropriate elements in the interface.
In this example, the callbacks that you supply are calls to other functions, the definitions for which are assumed to be available in a separate source code file, and are discussed in 19.9.6 Defining the callbacks. Note that you do not have to take this approach; you can just as easily specify callback functions within the interface definition itself, using lambda notation. It is up to you whether you do this within the Interface Builder, or by loading the code in the editor. If you choose the former, note that it may be easier to use the code view, rather than typing lambda functions into the Attributes dialog.
This section shows you how to specify all the callbacks necessary for each element in the example interface, together with other attributes that are required for correct operation of the callback functions. You need to specify attribute values for the display pane, the list panel and the graph pane.
Selection-Text in the layout hierarchy and display the Attributes dialog.selection-reader and click OK.
This reader allows the display pane to be identified by the callback code.
For the list panel, you need to specify four callbacks and a reader.
List in the layout hierarchy and display its Attributes dialog.list-reader. Do not click OK yet.
Like the display pane, this reader is necessary so that the list panel can be identified by the callback code.
|
The function that is called when you select a list item. | |
|
The function that is called when you extend the current selection. | |
|
The function that is called when you deselect a list item. | |
|
The function that is called when you double-click on a list item. |
Set the following attributes of the list panel:
Selection-Callback to 'update-selection-select
Extend-Callback to 'update-selection-extend
Retract-Callback to 'update-selection-retract
Action-Callback to 'display-selection-in-dialog
Click OK when done.
Graph graph pane and display its Attributes dialog.
For the graph pane, you need to set the same four callbacks, as well as a reader, and two other attributes that are important for the callback code to run correctly.
Selection-Callback to 'update-selection-select
Extend-Callback to 'update-selection-extend
Retract-Callback to 'update-selection-retract
Action-Callback to 'display-selection-in-dialog
graph-reader.(defun children-function (x)
(when (< x 8)
(list (* x 2) (1+ (* x 2)))))
Now set the Children-Function attribute to 'children-function.
The children function defines what is drawn in the graph, and so is vital for any graph pane. It is called when displaying the prototype interface, so it is best to define it before setting this attribute.
The callbacks that are necessary for the menu system are much simpler than for the layouts; the example interface only contains two menu commands, and they only require one callback each.
"Graph" menu item, display its Attributes dialog and change the Callback attribute to 'display-graph-selection. Click OK."List Panel" menu item, display its Attributes dialog and change the Callback attribute to 'display-list-selection. Click OK.
If you have followed this example from the beginning, the interface is now completely specified. You can now save the source code definition in a file.
 to save the interface definition. Choose a directory in the dialog that appears, and specify the filename
 ib-example.lisp in the "File name" text box.
The file ib-example.lisp is displayed in an Editor tool.
This section shows you how to create the callback functions you need to define in order to complete the working example.
to create a new file. to save the file. Save it in the same directory you saved ib-example.lisp, and call this new file ib-callbacks.lisp.ib-callbacks.lisp file:
(in-package "COMMON-LISP-USER")
to save the file when you have entered all the function definitions.
The functions that you need to define in this file are divided into the following categories:
One main function, update-selection, serves to update the display pane whenever selections are made in the graph pane or the list panel.
(defun update-selection (type data interface)
(setf (capi:display-pane-text (selection-reader interface))
(format nil "~A ~A" data type)))
The following three functions are the callbacks specified whenever a select, retract or extend action is performed in either the list panel or the graph pane. Each function is named according to the type of callback it is used for, and it simply calls update-selection with an additional argument denoting the callback type.
(defun update-selection-select (&rest args) (apply 'update-selection "selected" args))
(defun update-selection-retract (&rest args) (apply 'update-selection "deselected" args))
(defun update-selection-extend (&rest args) (apply 'update-selection "extended" args))
As with update-selection, one main function serves to display the data from any action in a dialog.
(defun display-in-dialog (type data interface) (capi:display-message "~S: ~A ~S" (capi:interface-title interface) type data))
The function display-selection-in-dialog is the action callback for both the graph pane and the list panel. It calls display-in-dialog, specifying one of the required arguments.
(defun display-selection-in-dialog (&rest args) (apply 'display-in-dialog "selected" args))
Note: Although only one action callback is specified in the example interface, the relevant functions have been defined in this modular way to allow for the possibility of extending the interface. For instance, you may decide at a later date that you want to display the information for an extended selection in a dialog, rather than in the display pane. You could do this by defining a new callback which calls display-in-dialog, passing it an appropriate argument.
Both menu items in the interface need a callback function. As with other callback functions, these are specified by defining a general callback, display-pane-selection, which displays, in a dialog, the current selection of any pane.
(defun display-pane-selection (reader data interface)
(declare (ignore data))
(capi:display-message "~S: ~S selected"
(capi:capi-object-name
(funcall reader interface))
(capi:choice-selected-items
(funcall reader interface))))
The following two functions call display-pane-selection, passing the reader of a pane as an argument. These functions are specified as the callbacks for the two menu items.
(defun display-graph-selection (&rest args) (apply 'display-pane-selection 'graph-reader args))
(defun display-list-selection (&rest args) (apply 'display-pane-selection 'list-reader args))
As with the other callback functions, specifying the callbacks in this way allows for easy extension of the example.
Graph panes require a function which is used to plot information, called the children function. The value of the ROOTS attribute of a graph is passed as an argument to the children function in order to start the plot. The example interface uses the following simple children function. You already defined this if you have followed the example, but add it also in ib-callbacks.lisp:
(defun children-function (x)
  (when (< x 8)
    (list (* x 2) (1+ (* x 2)))))
Note: The ROOTS attribute of a graph pane has a default value of (1). This is generated automatically by the Interface Builder.
Finally, the function test-ib-example is used to create an instance of the example interface.
(defun test-ib-example ()
  (capi:display (make-instance 'ib-example
                               :best-height 300
                               :best-width 200)))
If you have followed this example from the beginning, the interface and its callbacks are now completely specified. Next, you can create a Common Lisp system which integrates the interface definition with the callback code.
. This creates a new, unnamed file in the editor.(defsystem ib-test
(:package "CL-USER")
:members ("ib-callbacks" "ib-example"))
This form creates a system called ib-test that contains two members; ib-example.lisp (the file containing the interface definition) and ib-callbacks.lisp (the file containing the callback code).
to save the new file. Save it in the same directory that you saved the ib-example.lisp and ib-callbacks.lisp files, and call this file defsys.lisp.
You have now finished specifying the example interface and its callback functions, so you can test it.
to save ib-example.lisp, ib-callbacks.lisp, and defsys.lisp if you have not already done so.
Next, you need to load the ib-test system into the environment.
defsys.lisp is visible, and choose File > Load to load it and define the system.(load-system 'ib-test)
The ib-test system, together with its members, is loaded.
(cl-user::test-ib-example)
A fully functional instance of the example interface is created for you to experiment with, as shown in Example interface.
LispWorks IDE User Guide (Windows version) - 01 Dec 2021 19:38:04